

Ordering custom embroidered patches online is easier than most people expect, but understanding the process can help you get a better-looking patch, avoid delays, and make smarter decisions about pricing. Whether you need patches for a company, school, club, team, event, military unit, fundraiser, or organization, the ordering process usually follows the same basic path: choose your patch details, submit your artwork or idea, review a proof, approve the design, and place your order.
At PatchProfessionals.com, custom patches can be made in almost any shape, color, or size, and customers can work with our team to turn logos, sketches, or ideas into finished embroidered patches.
Quick Answer: How Do You Order Custom Embroidered Patches Online?
To order custom embroidered patches online, start by choosing your patch size, shape, embroidery coverage, backing, border, colors, and quantity. Then submit your logo, artwork, or design idea through a quote form. Our design team will create a digital proof for review. Once you approve the design and pricing, your patches move into production and are shipped when complete.
Step 1: Decide How You Will Use the Patch
Before choosing size, backing, or quantity, think about where the patch will be used. A patch for a uniform may need a different backing than a patch for a backpack, hat, jacket, or giveaway item.
Common uses include:
- Company uniforms
- Police, fire, EMS, and military patches
- Biker clubs and motorcycle groups
- Schools, scouts, and sports teams
- Fundraisers and awareness campaigns
- Outdoor clubs and adventure groups
- Event merchandise
- Employee recognition
- Brand promotion
We create patches for just about anyone! These might include clubs, events, political campaigns, fundraisers, athletic teams, organizations, companies, police, fire, EMS, military, biker groups, awareness campaigns, and scouting groups.
Step 2: Choose the Right Patch Size
Patch size is one of the biggest factors in pricing. Larger patches usually cost more because they require more thread, material, and production time.
The best way to calculate patch size is to measure the height and width, add those two numbers together, and divide by two. For example, a patch that is 3 inches tall and 4 inches wide would be priced as a 3.5-inch patch.
Formula:
Patch Size = Height + Width ÷ 2
So:
3″ + 4″ = 7″
7″ ÷ 2 = 3.5″
We also explain this sizing method on our patch options page.
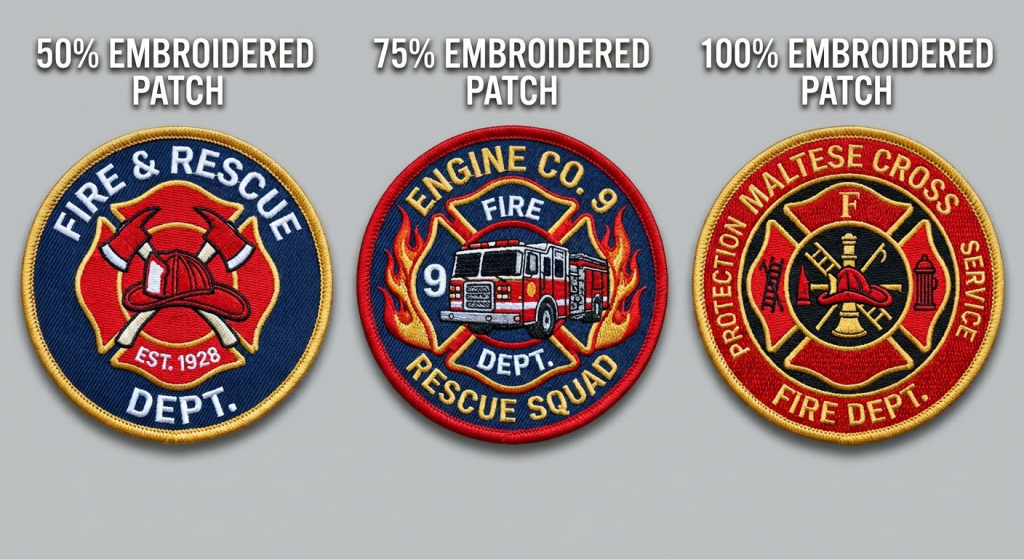
Step 3: Understand Embroidery Coverage
Embroidery coverage refers to how much of the patch surface is covered with thread. This affects both the look and the price.
50% Embroidery
This is often best for simple designs with a lot of open background space. The background is usually twill, while the main text or logo is embroidered.
75% Embroidery
This is the most common option for custom embroidered patches. It works well for designs with text, logos, multiple colors, and standard detail. PatchProfessionals.com notes that 75% embroidery is an industry-standard option for many custom patches.
100% Embroidery
This means the entire visible patch surface is covered with thread. It gives the patch a richer, more premium look and is often a good choice for detailed designs, multi-color backgrounds, or patches where no twill background should show.
Step 4: Choose Your Patch Backing
Backing determines how the patch attaches to clothing, gear, or other surfaces.
Common backing options include:
Sew-On Backing
This is the traditional choice. It is durable and works well for uniforms, jackets, vests, bags, and hats.
Iron-On Backing
Iron-on backing allows the patch to be applied with heat. It is convenient for casual use, but sewing is still recommended for heavy wear or frequent washing.
Hook-and-Loop Backing
Often called Velcro-style backing, this is popular for tactical, military, police, fire, EMS, and morale patches because the patch can be removed or swapped easily.
Tape Backing
This is usually used for temporary placement or short-term wear.
Step 5: Pick a Border Style
The border gives your patch a finished edge and helps protect it from fraying.
Merrowed Border
A merrowed border is the classic rounded stitched edge. It works best for simple shapes like circles, squares, rectangles, ovals, and shields.

Heat-Cut Border
A heat-cut border is better for custom shapes, detailed outlines, and patches with sharp edges or unique silhouettes.

Step 6: Know What Digitizing Means
Digitizing is the process of converting your logo, artwork, or design into a stitch file that embroidery machines can read. This is not the same as simply uploading an image. A designer or digitizer must decide how the design will be stitched, including thread direction, stitch density, layering, outlines, and detail adjustments.
Good digitizing matters because it affects:
- Small text readability
- Logo accuracy
- Thread texture
- Color separation
- Stitch direction
- Fine detail
- Overall patch quality
A design that looks good on a screen may need adjustments to work well as embroidery. Thin lines, gradients, tiny lettering, and photo-like details may need to be simplified so the final patch looks clean and professional.
Step 7: Understand MOQ
MOQ means minimum order quantity. This is the smallest number of patches you can order at one time.
Custom embroidered patches usually have an MOQ because every order requires setup, design review, digitizing, machine preparation, thread selection, and production time. Even if you only need a few patches, the same setup work is required.
In general, ordering more patches lowers the cost per patch because the setup and production work is spread across a larger quantity.
Step 8: What Affects Custom Patch Pricing?
Custom embroidered patch pricing usually depends on several factors:
- Patch size
- Quantity ordered
- Embroidery coverage
- Number of colors
- Backing type
- Border type
- Design complexity
- Specialty threads
- Rush production
- Shipping requirements
We have noted that every design can include up to seven free colors, with more than 130 colors available.
Step 9: Submit Your Artwork or Design Idea
You do not always need finished artwork to start an order. You can usually submit:
- A logo
- A sketch
- A photo reference
- A previous patch image
- A written concept
- Text instructions
- Brand colors
- Font preferences
The more details you provide, the easier it is for our design team to create an accurate proof.
Helpful details include:
- Patch size
- Quantity
- Shape
- Text
- Colors
- Backing choice
- Border style
- Intended use
- Deadline
- Any examples you like
Step 10: Review Your Digital Proof
Before production begins, you will receive a proof showing what your patch will look like. This is your chance to check spelling, colors, layout, size, shape, and overall design.
Review carefully for:
- Misspelled words
- Incorrect dates
- Wrong colors
- Small text that may be hard to read
- Logo spacing
- Border style
- Backing choice
- Patch shape
Do not rush this step. Once the proof is approved, the order will move into production.
Step 11: Approve and Place the Order
After the proof, pricing, and details are approved, your custom embroidered patches can move into production! Sometimes military patch orders include a proofing process before the customer confirms and places the order.
Frequently Asked Questions
How much do custom embroidered patches cost?
The price depends on size, quantity, embroidery coverage, backing, border, colors, and design complexity. Larger patches and smaller quantities usually cost more per patch, while higher quantities usually lower the per-patch price. Our pricing sheet is found here.
What is digitizing for patches?
Digitizing converts your artwork into a stitch-ready embroidery file. It tells the embroidery machine how to sew the design.
What does MOQ mean?
MOQ means minimum order quantity. It is the smallest number of custom patches that can be ordered at one time.
Can I order patches without finished artwork?
Yes. You can usually submit a logo, sketch, image, or written idea and work with our design team to create a proof.
What is the best backing for embroidered patches?
Sew-on backing is best for long-term durability. Iron-on is convenient for casual use. Hook-and-loop backing is best for removable patches.
What is the difference between 75% and 100% embroidery?
A 75% embroidered patch has some visible twill background. A 100% embroidered patch is fully covered with thread for a more premium look.
Final Takeaway
Ordering custom embroidered patches online is simple when you understand the key choices: size, quantity, embroidery coverage, backing, border, digitizing, and proof approval. The best results come from sharing clear instructions, reviewing your proof carefully, and choosing options that match how the patch will be used.
Ready to get started? Request a free quote from PatchProfessionals.com and turn your logo, artwork, or idea into a custom embroidered patch!